Saturday, October 31, 2009

Using git with a cvs repository

Edited 11/29/2009: Even better than the below, use git-cvs.

My situation: Developing for a software project that uses a CVS repository, but I really want to use git because I do a lot of development off-line and hate waiting until I get back online to commit (it's a pain to separate different commits and I forget what I did and why).

Poking around the web I found a couple of good blog posts (linked to at points in this post where I found them useful) on how to use git locally for a cvs repository. I weaved them together and here's what worked for me.

Prerequisite Software

First you need to have the appropriate software installed:

Make sure you have git-core package with cvsimport functionality:
% git help -a | grep cvsimport
cvsimport merge-recursive status

Make sure cvsps is installed, which it wasn't in my case:
% cvsps
cvsps: Command not found.
I installed on my Mac using port:

% sudo port install cvsps


And then I found it:
% rehash
% cvsps
Can't open CVS/Repository: No such file or directory

Overview
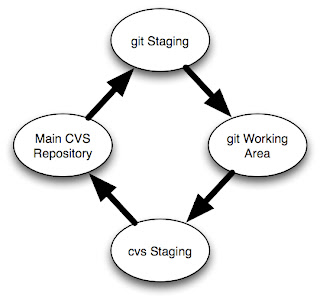
The image at right shows how the structure works. You start with your main cvs repository. You import this into a git staging repository. You don't do any work in the staging repository, it exists solely for importing from git.

You will then clone the staging repository into a working git repository where you will do all your development.

Then you'll have another cvs checkout of the main cvs repository. This is were you will integrate your changes made in your git repository back into cvs.

Kudos to Takis Blog for much of the mechanisms here, but note that this blog post is somewhat dated and the command syntax has changed (e.g. 'git-cvs-import' is now 'git cvs-import').

Set up

Make the git staging repository ("staging.git") and import the CVS repository (which for the sake of this post I'll call 'repo'):

% mkdir staging.git
% cd staging.git
% git cvsimport -p -x -v -d $CVSROOT repo
Add a tag to indicate current synch point with CVS:

% git tag CVS-LAST-EXPORT
Make your git working directory ("repo.git"):
% cd ..
% git clone -l staging.git repo.git
And check out your cvs staging area:
% cd ..
% cvs checkout -d staging.cvs repo
Pulling changes from cvs into git

If changes are checked into CVS, pull them into your git staging area by doing the following (the same command you used to create it in the first place).
% cd staging.git
% git cvsimport -a -p -x -v -d $CVSROOT foo
Then go to your working git directory and pull them in:
% cd ../repo.git
% git pull
Resolve any conflicts and commit them:
# edit files
% git commit -a
Pushing changes from git to cvs

Start by making sure your cvs staging repository is up to date:
% cd ../staging.cvs
% cvs update
Now examine the list of commits back to last CVS-LAST-EXPORT tag and commit all that you want to commit:
% setenv GIT_DIR ../repo.git/.git
% git log CVS-LAST-EXPORT..
# For each git commit id, execute the following
% git cvsexportcommit 547f3018a8f951dcc4187e5f171b337bfbad1883
# The last line of the above comment, will be a 'cvs commit' which you will execute:
% cvs commit -F .msg 'README'

Optionally you can add '-c' after "cvsexportcommit" and it will automatically commit for you if the change looks good.

When you are done, mark the last commit you exported with a tag:

% git tag CVS-LAST-EXPORT

Don't forget to unset the GITDIR environment variable when you are done:
% unsetenv GIT_DIR
After committing to cvs, go back and import the changes into your git staging and working repositories.

That should do it. I'm sure I'll update this post as I refine the process.

Update 11/1: Fixed typo with 'setenv GITDIR' command. Added CVS-LAST-EXPORT tag. Fixed '-p x' to '-p -x' options with 'git cvsimport'.
Update 11/3: Added '-a' to 'git cvsimport' and note about '-c' to cvsexportcommit.

Tuning in Digital Cable (QAM) channels on TivoHD

Just got a TivoHD. I know that Comcast in my area puts out digital channels (using what is called QAM) and the Tivo supposedly could tune them in, but it wasn't at all clear to me how to get the Tivo to do that. Here's how.

  • Go to TiVo Central, Messages and Settings, Settings, Channels, Channel Scan.
  • Select "Scan for channels" and settle in for 10-15 minutes. In my case it was half way through before it even found any channels, but it ended up finding 200+!
  • After it was done, I went back to Live TV and looked for my new channels, but couldn't find any but the ones I had before. Hmmm...
  • Ah, select "Guide" and then press Enter to bring up the Guide Options. (Update: see end of post for what is probably a better approach than this.
  • For "Channels" select "All"
  • Now you should see a bunch of new digital channels (they'll look like "12-1") in the Guide as well as when you surf through the channels.
Having figured that out, I still have to say I'm a little disappointed:
  • There is no show information for any of the digital channels.
  • Most (90%+!) of the digital channels seem to have no actual content, I just see a grey screen.
Now I suspect neither of those is Tivo's fault, I suspect it's Comcast's.

I'm not sure if there is anyway to have Tivo ignore the channels with no content. Plan to keep poking around with that.

Update: If you go toTiVo Central, Messages and Settings, Settings, Channels, Channel List you can mark which digital channels you receive. Once you have done that, under the Guide Options, leave Channel at "Chans You Receive" and then you will just see the channels you get.


Tuesday, October 27, 2009

Adding source code formatting to Blogger

I used this greasemonkey script. Definitely a little clumsy as you need to edit your Blogger template and install greasemonkey.

TweetDeck install and 3003 error

Update 11/23: Trying again with the 0.31.3 TweetDeck release, it installs fine. Shrug...

I'm trying to install TweekDeck on my Mac and I keep getting a 3003 error.

I turned on logging of the application install:

% touch ~/.airappinstall.log

And the full log follows.

% cat .airappinstall.log
waiting to receive open event
UI SWF load is complete
UI initialized
enter waitingForOpen
Unpackaging to /private/var/folders/t6/t6puj+oYFsmrOCU8+6+IHU+++TM/TemporaryItems/FlashTmp1
unpackaging is complete
application is bound to side-by-side version 1.0
application is bound to this version of the runtime
app id TweetDeckFast
pub id FFF259DC0CE2657847BBB4AFF0E62062EFC56543.1
Application not located
Waiting for user confirmation
User confirmed action: install
creating native installer in: /private/var/folders/t6/t6puj+oYFsmrOCU8+6+IHU+++TM/TemporaryItems/FlashTmp2
native installer creation complete
Starting install
Destination for installed application is /Applications
stateInstalling: [ErrorEvent type="error" bubbles=false cancelable=false eventPhase=2 text="Unhandled exception Error: Directory can't be written to" errorID=5006]
stateInstallingWithElevation: enter install
stateInstallingWithElevation: /Library/Frameworks/Adobe AIR.framework/Versions/1.0/Adobe AIR Application Installer -runtime /Library/Frameworks -silent -logToStdout -url -location /Applications -desktopShortcut -programMenu file:///private/tmp/TweetDeck_0_30.0.air
subinstaller: Starting silent app install of file:///private/tmp/TweetDeck_0_30.0.air
subinstaller: UI SWF load is complete
subinstaller: UI initialized
subinstaller: Unpackaging to /private/var/folders/zz/zzzivhrRnAmviuee+++++++++++/TemporaryItems/FlashTmp0
subinstaller: unpackaging is complete
subinstaller: application is bound to side-by-side version 1.0
subinstaller: application is bound to this version of the runtime
subinstaller: app id TweetDeckFast
subinstaller: pub id FFF259DC0CE2657847BBB4AFF0E62062EFC56543.1
subinstaller: Application not located
subinstaller: creating native installer in: /private/var/folders/zz/zzzivhrRnAmviuee+++++++++++/TemporaryItems/FlashTmp1
subinstaller: native installer creation complete
subinstaller: Starting install
subinstaller: Destination for installed application is /Applications
subinstaller: Beginning install
subinstaller: Copying /private/var/folders/zz/zzzivhrRnAmviuee+++++++++++/TemporaryItems/FlashTmp1/Template to /Applications/TweetDeck.app
subinstaller: chown of /Applications/TweetDeck.app completed with status 0
subinstaller: Execution complete; beginning commit phase
subinstaller: Commit complete
subinstaller: starting cleanup of temporary files
subinstaller: application installer exiting
received unknown message type from subinstaller: done
Failed during elevated install: 3003
starting cleanup of temporary files
application installer exiting


The obvious line is the exception about "Directory can't be written to" - but what directory? /Applications? Well, it is actually writing /Applications/Tweekdeck.app but that applications isn't executable:


% open /Applications/TweetDeck.app/
LSOpenFromURLSpec() failed with error -10661 for the file /Applications/TweetDeck.app.
Anyone have any suggestions?

[Updated 10/27 to include link to Adobe KB article on logging.]

Sunday, October 18, 2009

Google Docs folder sharing and my iPhone

One of the the things that has constantly annoyed me about my iPhone is that Safari is lousy at remembering my passwords. And I tend to use long, random passwords, which means they are (1) hard to enter on the iPhone pseudo keyboard and (2) hard for me to remember. Most of the time on my laptop, I keep my passwords in KeePass and cut'n'paste them into whatever application needs them (and yes, I think this is more secure than trying to memorize all the hundred+ passwords I have, but that's another post).

And yes, there are similar applications to KeePass for the iPhone, but I don't know any good way to sync my KeePass database with them.

One of the things I really like to do on my iPhone is access a set of recipes I have in Google docs. But inevitably my login session has timed out, so I have to go back to my laptop, get my Google password and type it in. By the time I do all that, it's easier just to have used my laptop in the first place.

However, when Google added the feature of sharing whole folders, a solution popped into my head: create a Google account just to use on my iPhone, give it a password I can actually remember, and then share my recipes with that account.

Why not just give my main Google account a password I can remember? Well, because I actually have stuff accessible by that account I care about, so I want a strong password on it. But since my new iPhone Google account only has access to stuff I share with it, and most of that is read-only, if that password is guessed, the ramifications are much less.