Trying to program my Harmony remote from WinXP inside of VirtualBox, I kept getting disconnect errors. Poking around, I found these directions (last four paragraphs of the post) for setting up a filter in the virtual machine configuration so that it automatically connects the USB device (the problem apparently is the remote disconnects when rebooting and without the filter, the virtual machine can't find it then).
Sunday, November 29, 2009
Sunday, November 8, 2009
Roku N1000 and Linksys EZXS55W equals network woes
Updated 3/13/2010: I've become convince the Linksys in question was just flakey and this was nothing specific to the Roku.
Long story short, looks like it just didn't get along with the Linksys EZXS55W 5-port switch I had there. Switch seems to work fine with everything else, so I just swapped it with another switch (different Linksys) and all was good.
Saturday, October 31, 2009
Using git with a cvs repository
Edited 11/29/2009: Even better than the below, use git-cvs.
My situation: Developing for a software project that uses a CVS repository, but I really want to use git because I do a lot of development off-line and hate waiting until I get back online to commit (it's a pain to separate different commits and I forget what I did and why).
Poking around the web I found a couple of good blog posts (linked to at points in this post where I found them useful) on how to use git locally for a cvs repository. I weaved them together and here's what worked for me.
Prerequisite Software
First you need to have the appropriate software installed:
Make sure you have git-core package with cvsimport functionality:
Make sure cvsps is installed, which it wasn't in my case:
And then I found it:
Overview
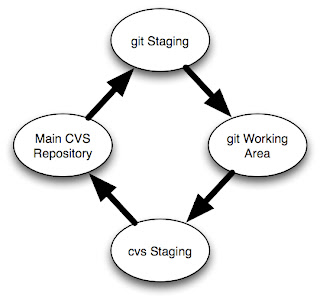
The image at right shows how the structure works. You start with your main cvs repository. You import this into a git staging repository. You don't do any work in the staging repository, it exists solely for importing from git.
You will then clone the staging repository into a working git repository where you will do all your development.
Then you'll have another cvs checkout of the main cvs repository. This is were you will integrate your changes made in your git repository back into cvs.
Kudos to Takis Blog for much of the mechanisms here, but note that this blog post is somewhat dated and the command syntax has changed (e.g. 'git-cvs-import' is now 'git cvs-import').
Set up
Make the git staging repository ("staging.git") and import the CVS repository (which for the sake of this post I'll call 'repo'):
If changes are checked into CVS, pull them into your git staging area by doing the following (the same command you used to create it in the first place).
Start by making sure your cvs staging repository is up to date:
When you are done, mark the last commit you exported with a tag:
Don't forget to unset the GITDIR environment variable when you are done:
That should do it. I'm sure I'll update this post as I refine the process.
Update 11/1: Fixed typo with 'setenv GITDIR' command. Added CVS-LAST-EXPORT tag. Fixed '-p x' to '-p -x' options with 'git cvsimport'.
Update 11/3: Added '-a' to 'git cvsimport' and note about '-c' to cvsexportcommit.
My situation: Developing for a software project that uses a CVS repository, but I really want to use git because I do a lot of development off-line and hate waiting until I get back online to commit (it's a pain to separate different commits and I forget what I did and why).
Poking around the web I found a couple of good blog posts (linked to at points in this post where I found them useful) on how to use git locally for a cvs repository. I weaved them together and here's what worked for me.
Prerequisite Software
First you need to have the appropriate software installed:
Make sure you have git-core package with cvsimport functionality:
% git help -a | grep cvsimport
cvsimport           merge-recursive     status
Make sure cvsps is installed, which it wasn't in my case:
% cvsps
cvsps: Command not found.
% sudo port install cvspsAnd then I found it:
% rehash
% cvsps
Can't open CVS/Repository: No such file or directory
Overview

The image at right shows how the structure works. You start with your main cvs repository. You import this into a git staging repository. You don't do any work in the staging repository, it exists solely for importing from git.
You will then clone the staging repository into a working git repository where you will do all your development.
Then you'll have another cvs checkout of the main cvs repository. This is were you will integrate your changes made in your git repository back into cvs.
Kudos to Takis Blog for much of the mechanisms here, but note that this blog post is somewhat dated and the command syntax has changed (e.g. 'git-cvs-import' is now 'git cvs-import').
Set up
Make the git staging repository ("staging.git") and import the CVS repository (which for the sake of this post I'll call 'repo'):
% mkdir staging.git
% cd staging.git
% git cvsimport -p -x -v -d $CVSROOT repo
% git tag CVS-LAST-EXPORT% cd ..
% git clone -l staging.git repo.git
% cd ..
% cvs checkout -d staging.cvs repo
If changes are checked into CVS, pull them into your git staging area by doing the following (the same command you used to create it in the first place).
% cd staging.git
% git cvsimport -a -p -x -v -d $CVSROOT foo% cd ../repo.git
% git pull# edit files
% git commit -a
Start by making sure your cvs staging repository is up to date:
% cd ../staging.cvs
% cvs updateOptionally you can add '-c' after "cvsexportcommit" and it will automatically commit for you if the change looks good.% setenv GIT_DIR ../repo.git/.git
% git log CVS-LAST-EXPORT..
# For each git commit id, execute the following
% git cvsexportcommit 547f3018a8f951dcc4187e5f171b337bfbad1883
# The last line of the above comment, will be a 'cvs commit' which you will execute:
% cvs commit -F .msg 'README'
When you are done, mark the last commit you exported with a tag:
% git tag CVS-LAST-EXPORTDon't forget to unset the GITDIR environment variable when you are done:
% unsetenv GIT_DIRThat should do it. I'm sure I'll update this post as I refine the process.
Update 11/1: Fixed typo with 'setenv GITDIR' command. Added CVS-LAST-EXPORT tag. Fixed '-p x' to '-p -x' options with 'git cvsimport'.
Update 11/3: Added '-a' to 'git cvsimport' and note about '-c' to cvsexportcommit.
Tuning in Digital Cable (QAM) channels on TivoHD
Just got a TivoHD. I know that Comcast in my area puts out digital channels (using what is called QAM) and the Tivo supposedly could tune them in, but it wasn't at all clear to me how to get the Tivo to do that. Here's how.
I'm not sure if there is anyway to have Tivo ignore the channels with no content. Plan to keep poking around with that.
Update: If you go toTiVo Central, Messages and Settings, Settings, Channels, Channel List you can mark which digital channels you receive. Once you have done that, under the Guide Options, leave Channel at "Chans You Receive" and then you will just see the channels you get.
- Go to TiVo Central, Messages and Settings, Settings, Channels, Channel Scan.
- Select "Scan for channels" and settle in for 10-15 minutes. In my case it was half way through before it even found any channels, but it ended up finding 200+!
- After it was done, I went back to Live TV and looked for my new channels, but couldn't find any but the ones I had before. Hmmm...
- Ah, select "Guide" and then press Enter to bring up the Guide Options. (Update: see end of post for what is probably a better approach than this.
- For "Channels" select "All"
- Now you should see a bunch of new digital channels (they'll look like "12-1") in the Guide as well as when you surf through the channels.
- There is no show information for any of the digital channels.
- Most (90%+!) of the digital channels seem to have no actual content, I just see a grey screen.
I'm not sure if there is anyway to have Tivo ignore the channels with no content. Plan to keep poking around with that.
Update: If you go toTiVo Central, Messages and Settings, Settings, Channels, Channel List you can mark which digital channels you receive. Once you have done that, under the Guide Options, leave Channel at "Chans You Receive" and then you will just see the channels you get.
Tuesday, October 27, 2009
Adding source code formatting to Blogger
I used this greasemonkey script. Definitely a little clumsy as you need to edit your Blogger template and install greasemonkey.
TweetDeck install and 3003 error
Update 11/23: Trying again with the 0.31.3 TweetDeck release, it installs fine. Shrug...
I'm trying to install TweekDeck on my Mac and I keep getting a 3003 error.
I turned on logging of the application install:
% touch ~/.airappinstall.log
And the full log follows.
The obvious line is the exception about "Directory can't be written to" - but what directory? /Applications? Well, it is actually writing /Applications/Tweekdeck.app but that applications isn't executable:
[Updated 10/27 to include link to Adobe KB article on logging.]
I'm trying to install TweekDeck on my Mac and I keep getting a 3003 error.
I turned on logging of the application install:
% touch ~/.airappinstall.log
And the full log follows.
% cat .airappinstall.log
waiting to receive open event
UI SWF load is complete
UI initialized
enter waitingForOpen
Unpackaging to /private/var/folders/t6/t6puj+oYFsmrOCU8+6+IHU+++TM/TemporaryItems/FlashTmp1
unpackaging is complete
application is bound to side-by-side version 1.0
application is bound to this version of the runtime
app id TweetDeckFast
pub id FFF259DC0CE2657847BBB4AFF0E62062EFC56543.1
Application not located
Waiting for user confirmation
User confirmed action: install
creating native installer in: /private/var/folders/t6/t6puj+oYFsmrOCU8+6+IHU+++TM/TemporaryItems/FlashTmp2
native installer creation complete
Starting install
Destination for installed application is /Applications
stateInstalling: [ErrorEvent type="error" bubbles=false cancelable=false eventPhase=2 text="Unhandled exception Error: Directory can't be written to" errorID=5006]
stateInstallingWithElevation: enter install
stateInstallingWithElevation: /Library/Frameworks/Adobe AIR.framework/Versions/1.0/Adobe AIR Application Installer -runtime /Library/Frameworks -silent -logToStdout -url -location /Applications -desktopShortcut -programMenu file:///private/tmp/TweetDeck_0_30.0.air
subinstaller: Starting silent app install of file:///private/tmp/TweetDeck_0_30.0.air
subinstaller: UI SWF load is complete
subinstaller: UI initialized
subinstaller: Unpackaging to /private/var/folders/zz/zzzivhrRnAmviuee+++++++++++/TemporaryItems/FlashTmp0
subinstaller: unpackaging is complete
subinstaller: application is bound to side-by-side version 1.0
subinstaller: application is bound to this version of the runtime
subinstaller: app id TweetDeckFast
subinstaller: pub id FFF259DC0CE2657847BBB4AFF0E62062EFC56543.1
subinstaller: Application not located
subinstaller: creating native installer in: /private/var/folders/zz/zzzivhrRnAmviuee+++++++++++/TemporaryItems/FlashTmp1
subinstaller: native installer creation complete
subinstaller: Starting install
subinstaller: Destination for installed application is /Applications
subinstaller: Beginning install
subinstaller: Copying /private/var/folders/zz/zzzivhrRnAmviuee+++++++++++/TemporaryItems/FlashTmp1/Template to /Applications/TweetDeck.app
subinstaller: chown of /Applications/TweetDeck.app completed with status 0
subinstaller: Execution complete; beginning commit phase
subinstaller: Commit complete
subinstaller: starting cleanup of temporary files
subinstaller: application installer exiting
received unknown message type from subinstaller: done
Failed during elevated install: 3003
starting cleanup of temporary files
application installer exiting
The obvious line is the exception about "Directory can't be written to" - but what directory? /Applications? Well, it is actually writing /Applications/Tweekdeck.app but that applications isn't executable:
% open /Applications/TweetDeck.app/
LSOpenFromURLSpec() failed with error -10661 for the file /Applications/TweetDeck.app.
[Updated 10/27 to include link to Adobe KB article on logging.]
Sunday, October 18, 2009
Google Docs folder sharing and my iPhone
One of the the things that has constantly annoyed me about my iPhone is that Safari is lousy at remembering my passwords. And I tend to use long, random passwords, which means they are (1) hard to enter on the iPhone pseudo keyboard and (2) hard for me to remember. Most of the time on my laptop, I keep my passwords in KeePass and cut'n'paste them into whatever application needs them (and yes, I think this is more secure than trying to memorize all the hundred+ passwords I have, but that's another post).
And yes, there are similar applications to KeePass for the iPhone, but I don't know any good way to sync my KeePass database with them.
One of the things I really like to do on my iPhone is access a set of recipes I have in Google docs. But inevitably my login session has timed out, so I have to go back to my laptop, get my Google password and type it in. By the time I do all that, it's easier just to have used my laptop in the first place.
However, when Google added the feature of sharing whole folders, a solution popped into my head: create a Google account just to use on my iPhone, give it a password I can actually remember, and then share my recipes with that account.
Why not just give my main Google account a password I can remember? Well, because I actually have stuff accessible by that account I care about, so I want a strong password on it. But since my new iPhone Google account only has access to stuff I share with it, and most of that is read-only, if that password is guessed, the ramifications are much less.
Tuesday, June 9, 2009
Installing Eclipse on my mac - ~/.eclipse write errors
Installing Eclipse 3.4.2, I did my usual download the tarball and, as root, untar it into /Applications. It would run fine, but after I installed packages, I kept getting all sorts of random errors with regards to writing to ~/.eclipse after installing packages.
The trick seems to be not to install it as root, but instead untar it as myself. Then it doesn't seem to create a ~/.eclipse and runs without errors.
The trick seems to be not to install it as root, but instead untar it as myself. Then it doesn't seem to create a ~/.eclipse and runs without errors.
Sunday, May 31, 2009
Booting a VirtualBox VM from removable drive without the GUI
I recently installed VirtualBox on one of my Ubuntu systems. I was intrigued by the VBoxManage command line client and was wondering if it would be possible to boot a VirtualBox VM from a removal drive entirely with a script (i.e. without the GUI).
The answer is yes. You can see the script in my google code repository (Updated to HG path).
In short, you create the VM as usual using the GUI (in theory you should be able to do that from the command line as well, but I need to work out details with the networking). Then remove the harddrive from the VM and copy the .xml and .vdi file to the removable drive. Then go ahead and remove the VM and harddrive from the GUI.
At this point you can boot the VM using something like the following:
The only hiccup at this point is if you have the GUI running, it seems to keep the VM open in some way that prevents you from ejecting the device.
Since I finished this script I discovered the VirtualBox SDK with Python bindings. For v2 of the script, then would be a natural thing to leverage.
The answer is yes. You can see the script in my google code repository (Updated to HG path).
In short, you create the VM as usual using the GUI (in theory you should be able to do that from the command line as well, but I need to work out details with the networking). Then remove the harddrive from the VM and copy the .xml and .vdi file to the removable drive. Then go ahead and remove the VM and harddrive from the GUI.
At this point you can boot the VM using something like the following:
$ vbox-add-vm.py -v -H /media/truecrypt1/VM.vdi /media/truecrypt1/VM.xmlThe script will automatically register the VM and hard drive, add the hard drive to the VM, boot the VM, wait for it to shut down and then unregister everything.
The only hiccup at this point is if you have the GUI running, it seems to keep the VM open in some way that prevents you from ejecting the device.
Since I finished this script I discovered the VirtualBox SDK with Python bindings. For v2 of the script, then would be a natural thing to leverage.
Saturday, May 9, 2009
Label Cloud on blog
I added a label cloud to the blog following these directions. My only change was to set minFontSize to 10.
Don't forget so save your template before you begin in case you screw up.
Don't forget so save your template before you begin in case you screw up.
Saturday, May 2, 2009
Getting my Wii Fit to talk to my Tomato Router
The situation: a Wii Fit and a Linksys-Cisco WRT54GL running Tomato 1.23. Every time I tried to connect the Wii Fit to my WPA2 network, I kept getting the following error:
Error Code: 51330 Unable to connect to the InternetA quick google turned by this page which led me to start playing with by wireless and security settings. Long story short, here are the settings (under the "Basic" setup menu) I ended up with that worked for me. I'm not sure all are important, but I'm pretty sure the last two (Encryption and Security) are.
Channel 1
B/G Mode: Mixed
Encryption: TKIP/AES
Security: WPA/WPA2 Personal
Monday, April 27, 2009
Wrangling Twitter, Facebook and Blog updates
I've got a number of blogs (why?) and I wanted to hook them up such that new posts got fed automatically to my Twitter account and Facebook status. Here a few tools I've found useful to do this:
- The Twitter app in Facebook updates your Facebook status from Twitter.
- Even better, Selective Twitter Status, lets you feed your tweets selectively to your Facebook status by ending them with #FB (kudos to this post for the tip).
- Yahoo Pipes allows you to combine multiple RSS feeds into a single feed, which is usefule if you are using something like the next item.
- To feed a single RSS feed into Facebook, under your Profile page click on Settings, then select Blog/RSS and give it the RSS url. This is nice because it will posts things as Noteson your Wall instead of in your status, but it's limited to a single feed (hence Yahoo Pipes is useful to use with this).
- TwitterFeed can post any number of RSS feeds to Twitter. It even supports OAuth, meaning you don't have to share your twitter username and password (plus you authenticate to TwitterFeed with OpenId, which is cool).
- I used Selective Twitter Status to update my Facebook status via selective feeds.
- I used TwitterFeed to feed my blogs posts into Twitter. Since they don't have the "#fb" tage, Selective Twitter Status won't carry them over into Facebook.
- I used Yahoo Pipes to combine by blogs RSS feeds and then the Facebook RSS function (under Profile/Settings) to display the blog postings on my Facebook Wall.
- To update my Twitter status I the Ubiquity built in Twitter command in FireFox (nice post on using this).
- I also have started using TweetDeck to monitor Twitter and may start using it to update Twitter.
- I also use Bookmarklets for Sharing in Facebook and Noting in Google Reader for sharing random stuff I run into on the net. I'm finding the Sharing in Facebook to be better since the result looks nicer with a thumbnail and quoted text.
Sunday, April 26, 2009
Installing TweetDeck on my Mac and "Error #2038"

After installing TweetDeck on my Ubuntu system I went to install it on my Mac (I love cross-platform apps), but the install kept failing with a "Error# 2038" error (see right).
So I had installed Air some time ago for something else (hmmm, can't remember what), so I thought perhaps it needed an update. So I wandered over to Adobe and installed a new version.

This represented an upgrade from "1.1.0.5790" to "1.5.1.8210" (see left).
And that did it - after that I went back to Tweetdeck and re-tried the install and it worked.
Wednesday, April 22, 2009
DISPLAY causes vi (vim) to hang...
Ran into a problem the other day that whenever I SSH'ed from hoe into a system at work and ran vi (OK, it's actually vim, but I'm old school and know it as "vi"), vi just hung. It took a good old ^C interrupt to get it to respond.
I ran "strace vi file" and saw it was hanging on the network.
Huh? It wasn't a network filesystem, so why is vi hanging on the network?
Well, on a hunch, I unset my DISPLAY environment variable:
And then things worked fine.
So vi was trying to do some X11 thing and was getting blocked by my ISP or my NAT router or something between me and work. What the heck vi (vim) is trying to do X11 I don't know....
I ran "strace vi file" and saw it was hanging on the network.
Huh? It wasn't a network filesystem, so why is vi hanging on the network?
Well, on a hunch, I unset my DISPLAY environment variable:
% env | grep DISPLAY
DISPLAY=c-XXX.hsd1.il.comcast.net:0.0
% unsetenv DISPLAY
And then things worked fine.
So vi was trying to do some X11 thing and was getting blocked by my ISP or my NAT router or something between me and work. What the heck vi (vim) is trying to do X11 I don't know....
Monday, April 20, 2009
Creating a local virtual host for testing
I have a modest little website. It's nothing too fancy, but has some php and css that make it non-trivial, enough that I'm uncomfortable making changes to it live, so I wanted to set up a secondary test server to try things out on.
Sounds easy enough, but where? A virtual host on the same server as my website seems logical enough, but I don't own the box it runs on, I get the space thanks to some generous friends and I didn't want to bug them for another favor to set up a virtual host.
Thinking about it I realized I was already running Apache on my laptop, so in theory could set up a virtual host on it. I could use /etc/hosts to create a "test hostname" pointing at my localhost I could use in URLs. So that's what I went about doing.
First, I added an entry to /etc/hosts:
$grep test.vwelch.com /etc/hostsThen I added the virtual host entry for test.vwelch.com to my Apache configuration so that it would recognize URLs using it and serve content from a separate location that it normally would. This is on a Mac, so the details here might vary based on your OS, but if you search for "virtual host configuration" and the name of your OS I suspect you'll find help.
127.0.0.1 test.vwelch.com
$ cat /etc/apache2/other/vwelch.confThen I checked out a copy of my website from my git repository into /usr/local/www, restarted Apache ("apachectl restart") and pointed my web browser at "http://test.vwelch.com" and I had a complete copy of my website in a local playground that I could develop on.
NameVirtualHost test.vwelch.com
ServerName test.vwelch.com
DocumentRoot /usr/local/www/
Options FollowSymLinks ExecCGI
AllowOverride All
Order allow,deny
Allow from all
Saturday, April 11, 2009
Creating a OWASP WebGoat Ubuntu-based VM

I wanted to play with OWASP's WebGoat. So I created a Ubuntu Desktop VM, and installed Java and WebGoat. You also need a web proxy to do the lessons, so I installed WebScarab along with the FoxyProxy extension for FireFox to make using it easy. This post details all the steps I went through.
I did find these directions for doing this similar. They are outdated, but kudos to them for some basic concepts I followed.
[Update 11/30/2011: And there is now apparently a
I started with a fresh copy of a Ubuntu 8.0.4 Desktop image (I made my own, but you should be able to use an existing image). Fire up the image, login in, fire up a terminal (Applications, Accessories, Terminal) and become root ("sudo -i").
The first step was to install java:
# apt-get-install sun-java6-bin sun-java6-jdk
Note that tomcat is now included with WebGoat, so there is no need to install it separately. The next step is to download WebGoat:
# wget http://webgoat.googlecode.com/files/WebGoat-OWASP_Standard-5.2.zip
# unzip WebGoat-OWASP_Standard-5.2.zip
# mv WebGoat-5.2/ /usr/local
# cd /usr/local/WebGoat-5.2/
You will need to edit the webgoat.sh file to set JAVA_HOME and change the java version from 1.5 to 1.6. I use 'vi', you can use your favorite editor.
# chmod 755 webgoat.sh
# cp webgoat.sh webgoat.sh.orig
# vi webgoat.sh
Add "export JAVA_HOME=/usr/lib/jvm/java-6-sun" at the start of file, after the line with CATALINA_HOME. And then change the "1.5" on lines 17, 19, and 23 to "1.6".
Next step was to install WebScarab, which is a proxy you'll need for WebGoat lessons. Download and install as follows:
# cd /tmp
# wget http://dawes.za.net/rogan/webscarab/webscarab-current.zip
# unzip webscarab-current.zip
# mv webscarab-* /usr/local/webscarab
Now, to make it easy to use WebScarab from FireFox, I installed FoxyProxy into FireFox. Visit the FoxyProxy web page, install it and restart FireFox.
When FireFox starts back up, configure FireProxy as follows:
- Click on FoxyProxy icon in lower right and select Add New Proxy. The FireProxy window should appear.
- On the General tab, under Proxy Name enter "WebScarab".
- On the Proxy Details tab, select Manual Proxy Configuration.
- For Host or IP Address enter "127.0.0.1"
- For Port enter "8008"
- On the URL Patterns tab select Add New Pattern
- For Pattern Name enter "WebGoat"
- For Pattern URL enter "http://*127.0.0.1/WebGoat/*" (The first "*" here matches the "guest:guest" string for authentication.)
- Click OK
- Close Proxy Settings
- Under Mode select Use proxies based on their pre-defined patterns and priorites.
- Close FoxyProxy Options
# java -jar /usr/local/webscarab/webscarab.jar
You should see a WebScarab window open after a moment.
Then, in the other window, fire up WebGoat:
# cd /usr/local/WebGoat-5.2
# ./webgoat.sh start80
WebGoat will churn for a little bit, but then you should eventually see a message like "INFO: Server startup in 3546 ms". At this point you are ready to go by pointing your browser at http://guest:guest@127.0.0.1/WebGoat/attack
At this point you should see not only WebGoat appear in your browser, but WebScarab should start displaying bunch of requests. Click on the image at the top of this post for what things should look like.
That's as far as I've gotten. Next step will be to dive into WebGoat.
Subscribe to:
Posts (Atom)