Showing posts with label git. Show all posts
Showing posts with label git. Show all posts
Saturday, October 23, 2010
Migrating from hg to git
So I had some stuff hosted by Google code using mercurial, but I mainly use git and I found going back and forth distracting, so I decided to move over to git. To do this I basically followed the guidance from this post and used the fast-export utility.
Thursday, August 19, 2010
git: Pushing a new branch back to an origin
OK, I know this is straight forward git stuff, but I just couldn't find a clear example anywhere. I cloned a remote git repository, created a new local branch and then wanted to push that branch back to the original remote repository (without merging it first).
First, I cloned a remote repository, e.g.:
git clone git@github.com:von/sandbox.git
Then I created a new branch locally and make changes in that branch:
cd sandbox
git checkout -b new-branch
edit && commit
Now I pushed the new branch back to the remote repository (i.e. origin) without merging it into the main branch (i.e. master). To do this, while on new-branch, just do a git push origin HEAD, i.e.:
git checkout new-branch
git push origin HEAD
Basically you are saying push to origin the current HEAD.
Saturday, March 13, 2010
Saturday, October 31, 2009
Using git with a cvs repository
Edited 11/29/2009: Even better than the below, use git-cvs.
My situation: Developing for a software project that uses a CVS repository, but I really want to use git because I do a lot of development off-line and hate waiting until I get back online to commit (it's a pain to separate different commits and I forget what I did and why).
Poking around the web I found a couple of good blog posts (linked to at points in this post where I found them useful) on how to use git locally for a cvs repository. I weaved them together and here's what worked for me.
Prerequisite Software
First you need to have the appropriate software installed:
Make sure you have git-core package with cvsimport functionality:
Make sure cvsps is installed, which it wasn't in my case:
And then I found it:
Overview
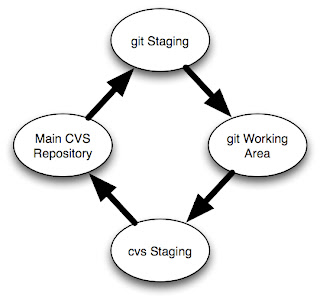
The image at right shows how the structure works. You start with your main cvs repository. You import this into a git staging repository. You don't do any work in the staging repository, it exists solely for importing from git.
You will then clone the staging repository into a working git repository where you will do all your development.
Then you'll have another cvs checkout of the main cvs repository. This is were you will integrate your changes made in your git repository back into cvs.
Kudos to Takis Blog for much of the mechanisms here, but note that this blog post is somewhat dated and the command syntax has changed (e.g. 'git-cvs-import' is now 'git cvs-import').
Set up
Make the git staging repository ("staging.git") and import the CVS repository (which for the sake of this post I'll call 'repo'):
If changes are checked into CVS, pull them into your git staging area by doing the following (the same command you used to create it in the first place).
Start by making sure your cvs staging repository is up to date:
When you are done, mark the last commit you exported with a tag:
Don't forget to unset the GITDIR environment variable when you are done:
That should do it. I'm sure I'll update this post as I refine the process.
Update 11/1: Fixed typo with 'setenv GITDIR' command. Added CVS-LAST-EXPORT tag. Fixed '-p x' to '-p -x' options with 'git cvsimport'.
Update 11/3: Added '-a' to 'git cvsimport' and note about '-c' to cvsexportcommit.
My situation: Developing for a software project that uses a CVS repository, but I really want to use git because I do a lot of development off-line and hate waiting until I get back online to commit (it's a pain to separate different commits and I forget what I did and why).
Poking around the web I found a couple of good blog posts (linked to at points in this post where I found them useful) on how to use git locally for a cvs repository. I weaved them together and here's what worked for me.
Prerequisite Software
First you need to have the appropriate software installed:
Make sure you have git-core package with cvsimport functionality:
% git help -a | grep cvsimport
cvsimport           merge-recursive     status
Make sure cvsps is installed, which it wasn't in my case:
% cvsps
cvsps: Command not found.
% sudo port install cvspsAnd then I found it:
% rehash
% cvsps
Can't open CVS/Repository: No such file or directory
Overview

The image at right shows how the structure works. You start with your main cvs repository. You import this into a git staging repository. You don't do any work in the staging repository, it exists solely for importing from git.
You will then clone the staging repository into a working git repository where you will do all your development.
Then you'll have another cvs checkout of the main cvs repository. This is were you will integrate your changes made in your git repository back into cvs.
Kudos to Takis Blog for much of the mechanisms here, but note that this blog post is somewhat dated and the command syntax has changed (e.g. 'git-cvs-import' is now 'git cvs-import').
Set up
Make the git staging repository ("staging.git") and import the CVS repository (which for the sake of this post I'll call 'repo'):
% mkdir staging.git
% cd staging.git
% git cvsimport -p -x -v -d $CVSROOT repo
% git tag CVS-LAST-EXPORT% cd ..
% git clone -l staging.git repo.git
% cd ..
% cvs checkout -d staging.cvs repo
If changes are checked into CVS, pull them into your git staging area by doing the following (the same command you used to create it in the first place).
% cd staging.git
% git cvsimport -a -p -x -v -d $CVSROOT foo% cd ../repo.git
% git pull# edit files
% git commit -a
Start by making sure your cvs staging repository is up to date:
% cd ../staging.cvs
% cvs updateOptionally you can add '-c' after "cvsexportcommit" and it will automatically commit for you if the change looks good.% setenv GIT_DIR ../repo.git/.git
% git log CVS-LAST-EXPORT..
# For each git commit id, execute the following
% git cvsexportcommit 547f3018a8f951dcc4187e5f171b337bfbad1883
# The last line of the above comment, will be a 'cvs commit' which you will execute:
% cvs commit -F .msg 'README'
When you are done, mark the last commit you exported with a tag:
% git tag CVS-LAST-EXPORTDon't forget to unset the GITDIR environment variable when you are done:
% unsetenv GIT_DIRThat should do it. I'm sure I'll update this post as I refine the process.
Update 11/1: Fixed typo with 'setenv GITDIR' command. Added CVS-LAST-EXPORT tag. Fixed '-p x' to '-p -x' options with 'git cvsimport'.
Update 11/3: Added '-a' to 'git cvsimport' and note about '-c' to cvsexportcommit.
Subscribe to:
Comments (Atom)